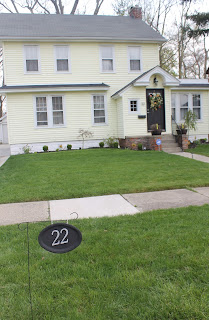
It's been a rainy few days in the mitten state, so I still haven't completed my flower bed/Sedum garden. Nevertheless, once the sun actually showed its face I decided that it was fine time for a little DIY. This project began like so many others do--in the aisles of the Dollar Tree :) I'd purchased a flag post and a garden flag, but once I got it home I discovered that the flag fit terribly...no biggie. My mind simply began going down the line of what I could do with my now useless post. Then it dawned on me, an address sign! I've been wanting an address sign for quite sometime now. Although our address is clearly posted on our home, I find the little posts to be endearing.
However, what I don't find to be endearing is the price...
You want how much for what????
I just can't see spending that type of money for something to literally stick in the ground. Of course there were some signs that were a bit less and some that were a bit more. But the point here is that I thought it was grossly overpriced...so I decided to make one of my own :) I always say there's nothing like DIY. It gives you something to do, and you can save money while doing it, yuppers!
To complete this project you'll need:
1 metal serving plate from the Dollar Tree
1 garden flag post from the Dollar Tree
Spray paint the color of your choice (I used Rust-Oleum High Heat with a tough protective enamel since it will be outside)
Numbers of your address that fit into your plate (I went with 4" reflective numbers)
2 hooks (comes in a pack for $.59 at Lowes)
Drill
Hammer and nails (included with numbers) or glue
Here's what I started with. I really liked the floral embellishments around the plate, I knew it would give my sign a little extra oomph! Never mind those eye hooks--didn't need them.
I started by spray painting my plate. It was a lovely day so the sun sped up the dry time :-) Be sure to paint both front and back. I painted each side twice.
I kept it real simple with just a plain flat black, but remember you can get as creative as your imagination and pocketbook will allow ;-) Don't look at my horrible (backyard) grass--that's a work in progress!
Once my plate was dry I enlisted the help of my hubby to drill the holes at the top. If you have a high power drill you should be fine, but if you have a basic drill it might take a little muscle. Although I did not drill my holes first, I think it would be best to do it that way. After the holes were in place, I had to touch up my paint job :(
My Hubby is so helpful...sometimes!
Next came attaching the numbers to the plate. Be sure to position the numbers where you would like them to go to make certain it looks the way you desire. I used my handy dandy hot glue gun--and honestly I advise against this. The glue was a bit messy and left me having to retouch the sign...again. *Sigh* After all of that, I ended up having to re-spray my plate and then I used super glue to secure the numbers...whomp!
Once your numbers are attached simply put the hooks through the holes and slip it onto the post. Next, be sure to stick it in the ground and admire your handy work. That's that!
Here's a close up :) It was still a little wet, but who cares--I was ready to put it out.
And here's the big picture. Hubby wants to get a stronger post and says that we should put flowers around it. Me? I'm just pleased! :)
My sign may not be as fancy as the ones you purchase in stores, but I got what I wanted for a fraction of the cost. All together I paid about $7, I think that's a darn good deal. Keep in mind, your project may cost a little more depending on how many numbers you have in your address and the style of number that you want.
So now that my first outdoor DIY project is completed for the year, maybe I can find the strength to tackle that sedum garden, at least that's what I hope. Until the next time guys, XO!


