Wednesday, July 27, 2016

In A Sentimental Mood ( DIY Salt Dough Keepsake Handprint)

Hey Guys! I hope all is well. I wanted to share with you this quick and easy DIY project. Want to know the best part? You probably already have everything that you need in your kitchen to make a keepsake handprint. So what do you need to make the masterpiece?
  • 1 cup salt
  • 1 1/2 cup flour
  • 1/2 Water
  • Rolling pin or glass (to roll)
  • Wax paper
  • Paint
That's it! Simple right? Right! :-) So the kiddo and I actually did this project for Father's Day. However, anytime is a great time for a sentimental gift. I think there's something special about homemade gifts from children. No one will believe that a four year-old actually picked out that wool blend suit, but getting them in on the action and letting them create, that's truly a way that they can contribute.

*Not sure why I don't have a picture of all the ingredients in the bowl, but pour it all in and mix it all up. You'll end up with a mixture like this:


I rolled the dough into a ball in order to flatten it in preparation for the handprint. Note: Transferring it from the cutting board didn't work for me. So I tried rolling again with the dough already in the pan with the parchment paper.

Smoothed out the dough more for a better surface. If you have a rolling pin, roll out the dough. No rolling pin? No problem! I actually used a glass cup ;-)

Once the dough was rolled the way I liked, I had my little one do the honors of pressing his hand into the dough, and he was happy to help...tada!
 
I actually tried a couple of different shapes. I liked the oval shape better, but after a few times of starting over, we said forget it--this just had to do! LOL!
 
Once the hand print is in the dough it's time to place it in the oven. Bake your keepsake on 200 degrees for 2 hours. Super easy! And here's the finished product:

A little spray paint  of your choice and it's ready to gift. My husband really liked it :)
 
*If I ever try this project again I think I'll let the mold bake a little longer. Initially, the handprint wasn't as firm as I would have liked, but it hardened over time. Overall, this is a really quick, sentimental, one-of-a-kind gift. If you decide to gift it, I know it will definitely earn you a few smiles.
 
Until the next time guys, XO!

Tuesday, July 19, 2016

Another Bed Made!

I am exhausted. Even as I write this, the dull ache of a hard day's work plagues my body. However, there is a smile on my face. I feel accomplished. I have finally completed the flower bed that I began creating almost three months ago. So why the delay? Time. Money. Life. To be honest, a lot of my other projects took a backseat to my book, but I am so happy to finally be able to check this one off of my list.

If you've been following the blog then you know that when we moved into our house there was absolutely no landscaping whatsoever. In the first year we took our house from this:                                               
To this:

 
Not too bad huh? As lame as it may sound, this year I was more than excited to see the fruits of out labor from last year. Our bushes are a little bigger, our trees are fuller, and the hydrangea's are taller (sorry, didn't snap a pic of that). Nevertheless, the side of our house was still absolutely bare. Boooo!
 
Originally, I wanted to create a sedum garden. Unfortunately, the sedum we purchased is dead now.  I won't be buying anymore sedum until next year, but we did get a little something in the ground to get the garden going. But first I had to make the bed.
 
If you have never made a flower bed from scratch before, let me tell you, it definitely isn't work for the weak. I wanted to stop so many darn times, but then I thought of my ancestors, lol! How dare I give up on making a simple flower bed? How dare I not work for something that I would enjoy? I felt like I would be a disgrace to every slave that ever tolled in the hot sun if I stopped, but that's exactly what I felt like--a slave!
 
Who knew that digging into the earth was such hard work? I mean, it doesn't seem like it should be that much of a feat, but our ground was so HARD! By the time that I finished I was dirty, sweaty, hot, and tired--but most importantly I was done. I would never have to make that bed again.


*Insert tired pant here*
 

The next step was to get the rocks to use as the border...which was an adventure within itself! The quarry was a whole new world to me. I stood in line listening to people make orders of upwards of two-thousand dollars, and when it was finally my turn I confidently walked up to the desk and said, "I just need a few rocks", lol. Shoot! No shame in my game. They had big bins of boulders, but since my money wasn't laying like that I was directed to select my own rocks at $.10 a pound.
 
The rocks were housed in these brick wall separators. I went from section to section looking for the rocks that I thought would work best for me while being mindful of the $.10 per lbs. price tag.

Moving about the quarry. You can't tell from this picture, but there was so much movement going on that I really had to be careful of where I was walking. There were dump trucks dumping mulch, bulldozers hauling rocks, cranes lifting who knows what...I felt like I was on the Island of Sodor (for all you Thomas the Train fans). I got more than a couple of amused stares as I travelled about. It was almost as if their faces were saying :who is this chick with this afro and this measly amount of rocks?" But I was undeterred. My money spends just like anyone else's and I was getting what I needed, so boom! I might add that everyone at Bedrock Quarry was very kind and helpful :-)
 
I couldn't wait to get my rocks home. Imagine my disappointment when I realized that I still didn't have enough. I'd spent $12 (way too much for something that should be free in my opinion) and it didn't even cover the halfway mark. Refusing to pay anymore money on a natural resource, I decided that it was time to go rock hunting...the real way. The hubby came with and I took to Facebook to declare my appreciation.
 
 
We eventually found what we needed and all was right with the world. But that's when life began to happen and those two dirt piles sat there for so long that they killed my darn grass *deep sigh*. So now I had an empty bed, dead grass, and a gang of rocks highlighting the ton of nothing that I had planted. I hate not finishing projects, but I had to just leave it alone until I could do better. I didn't "do better" until 3 months later--3, wow!
 
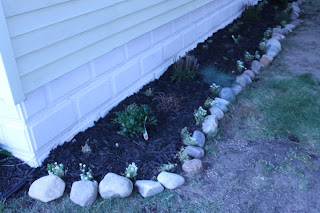
Unfortunately, I didn't get any really good pics, and the things that were planted need time to grow before it will really make a statement, but here is my new flower/sedum bed.
 
 If things look pretty spaced out to you that's because it is. Many of the things we planted will eventually grow quite a bit, so we had to be sure to leave the proper spacing.
 
But before we got to the finished product we had to put in some work! The first thing we had to do was line the bed with paper (you can use fabric, we've used it before, but obviously paper is cheaper). This helps with weed control. Once the paper was staked in place it was then time to pour in the dirt. We used plain old top soil.
 
 
Here's the hubby pouring the dirt. I was very upset about the clumps. It meant more work, breaking the large chunks into "plantable" (is that a word?) dirt.
 
After getting the dirt together and lined up to the height of the rocks, we began planting. I selected Elijah Blue Fescue Grass, China Boy Holly, Veronicas, and Lupines for the space. Because you can barely see our little budding garden I decided to include pics of the full grown plants for good measure:
 
Elijah Blue Fescue Grass
China Boy Holly
Veronica's
Lupines
 
I can't wait until it all fills in!!! I hope it looks as good in real life as it does in my head. I wanted something that would come off a little wild, but still very contained--sort of like me ;-)
 
Of course our little guy had to get in on the action too. He gave the plants a good watering and he helped dig the holes as well :)
 
Mr. Helpful. Watering the China Boy!
 
Loving those gardening gloves!!!


 Digging and planting with daddy!
 
After it was all said and done we finished off the bed by adding some free annuals that I picked up at the nursery across the street, and of course some black mulch.
 
I was geeked!
 
 
Next up,is spreading some dirt and planting some grass seeds in the places that my negligence killed  :( I find comfort in the fact that new grass was inevitable anyways, we already needed it, and we already have seeds in the garage. No cost there!!! 
 
And that, good people, is that! One more flower bed down and a whole backyard to go.  Until the next time guys, XO!


Wednesday, July 6, 2016

I Love Detroit! Tourist Time.

Hey Guys! Sometimes I like to play tourist in my own town. Well technically, I'm not from Detroit, but it's just down the street. Anywho, I truly adore "The D". It gets a bad rap, but there are some serious gems to uncover if only you venture out--and that's exactly what we did. Our adventure began with an Instagram Post from Pure Detroit advertising a free tour of the Fisher Building. Did I see the word FREE? I was instantly interested, LOL! I've always wanted to explore some of the buildings downtown, and finally, this was my chance.

Just stepping inside of the building was amazing. I mean, this place is an architect's/photographers dream.

*Swoon*
 
Handpainted artwork ;-)
 
Look at that celing!
 
 
We started the day off with a little bit of a history lesson. You can grab some of that history here. I was in awe the entire time. Boasting bronze, marble, granite, brass, and gold leaf mosaics, there's no wonder why the Fisher Building is considered Detroit's largest art object--and you can do that when you're given a blank check! Back in the day, the Fisher Building was truly the place to be. And get this--while you visited (shopping, theaters, business, etc.) the attendants in the parking garage would fill your gas tank and perform routine maintenance on your car...absolutely free...for every single car. Talk about customer service! That would have been enough of a reason for me to hang out for the day ;-) After learning all about the building and the major players that made it possible, we were free to explore.


So much detail...absolutely gorg!

If memory serves me correctly, these beautiful chandeliers were $25,000 a piece...and they were everywhere!


Pretty, but very low upper level railings. Apparently safety wasn't a priority in the 20s.

More handpainting!

:-)

 So colorful and lively!
Love this view!

Nice!
 
 
We were also able to go to the very top of the building and explore some of the office space.
Look ma, I'm on top of the world!!
 
After our (1 hour) guided tour concluded, we could then wonder the building in search of the best photo ops! I was more than ready for that :-)
 
He's not looking...

He's still not looking...oh well
 
We had a great time. Our guide was extremely knowledgeable, and the other people on the tour were also pleasant. I honestly couldn't believe that it was free. No catch! Pure Detroit seems to be an amazing company. Not only is it a Detroit based/themed business, but they're bringing people out on free tours to restore the pride and intrigue of the city. Their store is pretty dope too.
If I owned a store I would most definitely want it in a historical building. There were so many things in here that I wanted!
 
Once we left the Fisher Building, my husband decided that we should go on a boat tour. He'd been on one with Diamond Jack's  before and thought that my son and I would enjoy it. I didn't know if we would be able to snag tickets since we didn't plan in advance, but luckily, we did. This time, I really got to get some good use out of my camera. When I say that I pretended to be a tourist, I mean it!
Me and baby Love, ready to ride!


Going underneath the Belle Isle Bridge...
 

The hubby's big draw was wanting me to see all the beautiful homes on the route, here's Kid Rock house here.

Riverside restaurant

 Out for a sail
 
And then, draw drop! Here's the houses he was talking about. These are located on the Canadian side.
Living good...

:)

Nice view!


Whhatttt!! Gorg! What do I have to do to live like this??

I would take either one of these homes...

The balcony, the ivy...I want it all!

 Well alrighty then...
Love it! 
 
 Nice!!

WOW!

I thought this church was awesome!

 The U.S/ Canadian bridge
 

Going under...

 Huge ship...picture doesn't even compare
 

I was just snapping! :)


 An oldie, but goodie for all my Michigan folks!
Going back to Detroit (LL's voice)
  
All in all, we were able to do two tours, one by building and one by boat. It was lovely being able to see the city in a way that I had never seen it before.
 
 And of course, our little guy had to take a spin before we left
 
 
Maybe we can rent this bus one day with some of our friends and family and do a tour of another kind ;-)
 
It truly was an amazing day. The experience was new and fresh even though I was somewhere I've always been. If you haven't tried it yet, I strongly suggest playing tourist in your town or in a city near you. Not only is it cheap, but you'll discover new things in the process. If you've played tourist recently, I'd love to hear about your time. Until the next time guys, XO!